MENU
BD | BDT

BD | BDT
-
- All Pipettes, Dispensers & Automated Liquid Handlers
- Mechanical Pipettes
- Electronic Pipettes
- Multi-Channel Pipettes
- Positive Displacement Pipettes & Dispensers
- Bottle-Top Dispensers
- Pipette Controllers
- Dispenser & Pipette Accessories
- Automated Pipetting
- Automation Consumables
- Automation Accessories
- Liquid Handler & Pipette Services
Sorry, we couldn't find anything on our website containing your search term.
You are about to leave this site.
Please be aware that your current cart is not saved yet and cannot be restored on the new site nor when you come back. If you want to save your cart please login in into your account.
Sorry, we couldn't find anything on our website containing your search term.

Master your Bioprocess: Top 10 Expert Tips
Benjamin Wolters Lab Academy
- Bioprocessing
- Lab Life
- Bioprocess
- Essay
At the Eppendorf applications lab we have compiled ten tips to empower you in mastering daily bioreactor tasks. With their guidance, you'll navigate the complexities of bioprocessing with confidence and precision.
Eppendorf Bioprocess Center
Congratulations on getting started with bioprocessing! As you embark on this exciting journey, it is important to build on your foundational training and explore practical strategies to enhance your operations. Elevate your bioprocessing skills with these suggestions from Eppendorf.
Read more
1. Use rubber band to simplify bioreactor handling
BioBLU® Single-Use Bioreactors from Eppendorf come pre-sterilized and double wrapped in plastic foil to allow for aseptic unpacking of the vessels under the laminar flow hood. Although tubing lines sticking out of the head plate are coiled up and tied up with easily removable and reusable cable ties (Figure 1, left), they crowd the space above the headplate, making it sometimes hard to access the Pg 13.5 ports, for example when inserting a sterile sensor or during prefilling. The operator can use a simple rubber band to secure those tubing lines which holds them on the side of the reactor (Figure 1, right). This way, the space above the headplate is easily accessible and tubing lines will not interfere with the handling of pipettes or sensors.
Read more
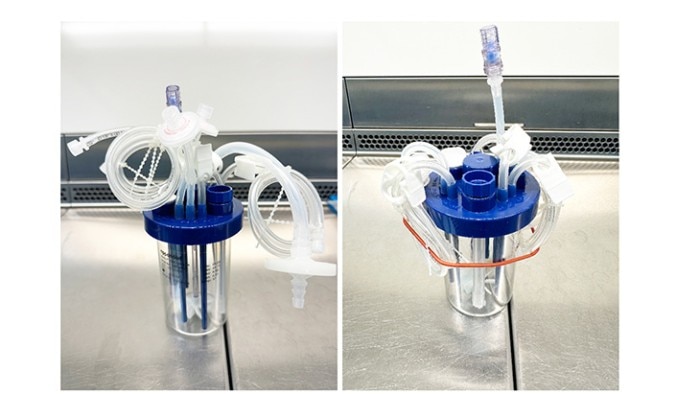
Figure 1: Left: BioBLU Single-Use Bioreactor as it comes out of the packaging. Right: Tubing lines secured with rubber band.
2. Improve handling by placing your controller next to a laminar flow cabinet
Depending on the budget, one of the biggest constraints in laboratories besides equipment is space. Therefore, the following recommendation might be hard to realize for some labs. However, the proximity of the bioprocess controller to a laminar flow cabinet not only reduces the walking distance, but also allows for the permanent sterile handling of connected media bottles. This can be achieved by connecting these bottles with sufficiently long tubing lines, that allow for moving of the bottles into the laminar flow hood, even when they are still connected to the bioreactors. This solution comes in handy, when there are no options for tube welding or if the process does not allow for disconnecting the vessels in the middle of the run.
Read more
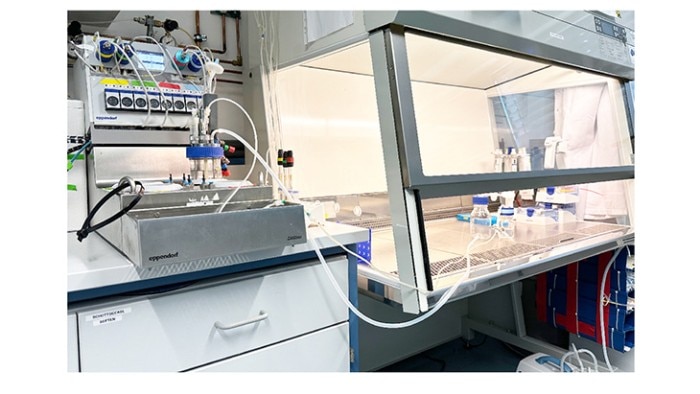
Figure 2: DASbox® Mini Bioreactor System placed next to a laminar flow cabinet. Connected media bottles are placed into the cabinet.
3. Save time with overnight DO sensor polarization and sterility check
The last step before inoculation is the calibration of the DO sensors. This step is usually performed under experimental conditions, i.e. pre-assembled, sterile, and prefilled bioreactor vessel, tempered and agitated at experimental setpoints. Depending on the type of DO sensor, it is required to polarize it for at least 6 hours before calibration. Sensor polarization refers to the process of establishing an anode and a cathode within the polarographic DO sensor by supplying a voltage from the control station. This polarization is necessary for the sensor to function properly, as it allows the sensor to generate a current proportional to the amount of dissolved oxygen in the solution.
The operator can save time by performing this step overnight. Additionally, it comes with the advantage that potential contaminations of the culture medium may be detected as turbidity the next day and early mitigation measures can be taken before initiating the actual experiment.
DO sensor polarization and calibration can be further simplified with the Auto Calibrate software feature of the BioFlo® 320 and BioFlo 720 bioprocess controllers from Eppendorf, which automatically calibrates all attached DO sensors at once.
Read more
4. Let gravity do the job
Once the operator has progressed with their preparation and finally reaches the point of prefilling of the vessel, filling a reactor with a peristaltic pump can take quite some time, especially for larger vessels. Assuming a pump rate of 40 mL/h, prefilling or emptying a reactor with a working volume of 100 mL will take 2.5 hours. This means that an operator can spend almost their entire workday with watching 250 mL of liquid flowing from A to B.
Another way is using gravity for this. Once the liquid flow is established, there is no need for a pump. If we do the math of the Hagen-Poiseuille law, then we can derive:
Another way is using gravity for this. Once the liquid flow is established, there is no need for a pump. If we do the math of the Hagen-Poiseuille law, then we can derive:
Read more

with
Q = volume flow [m3 /s]
ΔP = pressure difference [Pa]
r = inner radius of tubing [m] = 0,0015875 m (corresponds to inner tubing diameter of 0.125 inch)
η = dynamic viscosity [Pa s] = 0.001 Pa s for water
L = tubing length [m] = assuming 1 m
ρ = density [kg/m3 ] = 997 kg/m3 for water at room temperature
g = gravitational acceleration constant [9.81 m/s2 ]
h = height of liquid column [m] = assuming 1 m
Read more
Gravity will do the job much faster. The only way the operator can effectively increase the volume flow without applying additional pressure to the system is by increasing the tubing diameter and with it, every diameter of each tapering the liquid has to pass, since the total volume flow is limited by the narrowest opening of the system. An increase in height will inevitably lead to an increase in tubing length, which will cancel out eventually.
Read more
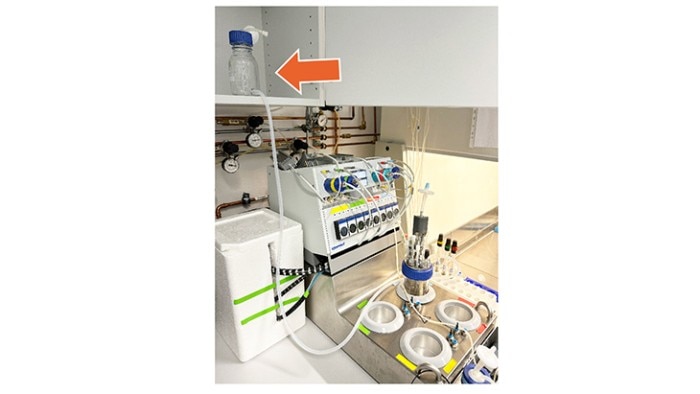
Figure 3: Addition bottle placed above the bioreactor (arrow).
5. Avoid filter clogging with a foam trap
Let's take a look at two things that can cause your exhaust gas filter to get clogged, and how to avoid that by implementing a foam trap. First: During the bioprocess the exhaust gas is usually cooled, for example to avoid that the liquid within the vessel is not gradually lost over time due to evaporation. If things go wrong, vapor might condensate within the exhaust filter and lead to its clogging. Second: Some applications generate excessive amounts of foam which can potentially lead to the clogging of the exhaust gas filter, for example due to high gassing and stirring rates in microbial fermentations, cellular components and metabolites or high protein concentrations.
Clogging of the exhaust gas filter can potentially lead to a pressure build-up, which might interfere with a proper supply of process gases.
To circumvent this problem, the operator can implement a liquid/foam trap, which is essentially an additional bottle between the culture vessel and the exhaust gas filter. The tubing of the off-gas pipe can be connected to the headspace of a glass bottle via head gear. The exhaust of the bottle also originates from the headspace, so that any liquid will be trapped in the bottom of the bottle (hence the name). The only thing to keep in mind is to plan for a sufficiently large bottle.
Read more
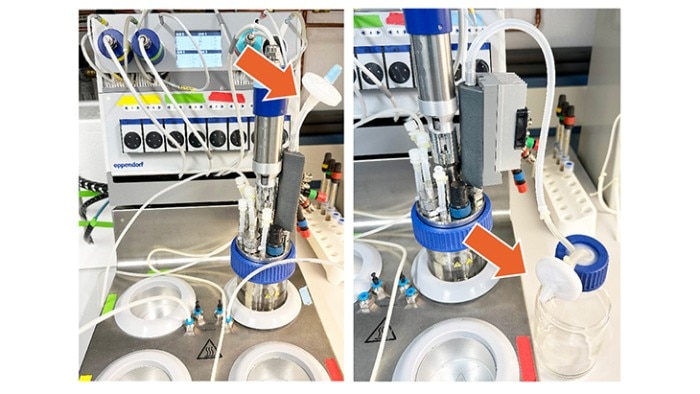
Figure 4: Left: Standard configuration. Exhaust filter (arrow) connected directly to exhaust line. Right: Installation of bottle as foam trap between exhaust line and exhaust filter (arrow).
6. Avoid Luer Lock Issue (aka know your plastics)
There are essentially three ways to establish tubing connections between the vessel and any additional bottle: permanent (uninterrupted tubing line from vessel to bottle), welded, or via additional connectors. Very common connectors in that context are precision molded (hence plastic) Luer connectors. They come in all shapes, colors and flavors – which makes it tempting to use male and female counterparts of different makes. At room temperature, this might not be too big of an issue, but when connected and put into an autoclave, the different plastics might show different thermal expansion behavior, which can potentially lead to capillary cracks (mostly in the female connector). These tiny fissures can cause leakages when used in pump setups, either preventing proper transfer of the liquid or even causing contaminations, because of liquid (e.g. medium) forming on the interface which serves a growth environment for airborne microbes.
To prevent this insidious disaster from happening, make sure to use the same type of connectors, do not tighten them too much before autoclaving or even better, assemble them after autoclaving under a laminar flow hood with sterile tweezers (requires some dexterity, but you’ll get there).
To prevent this insidious disaster from happening, make sure to use the same type of connectors, do not tighten them too much before autoclaving or even better, assemble them after autoclaving under a laminar flow hood with sterile tweezers (requires some dexterity, but you’ll get there).
Read more
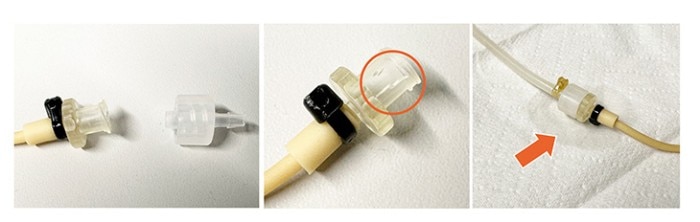
Figure 5: Left: The male and female connectors are made of different types of plastic, as can be seen from their different colors. Middle: After autoclaving of the assembled Luer lock connector, a crack can be observed in the female connector (circle). Bottom: Liquid is leaking from the broken connector (arrow).
7. Improve cleaning of dip tubes
After the finalization of a bioprocess run, all equipment must be cleaned. Depending on the application, it is common to observe proteinaceous deposits on interfaces that were in direct contact with the broth. These precipitations can be very tenacious and will only disappear after an extensive scrub. While this is easily doable for reachable surfaces, this may become nearly impossible for dip tubes or other tapering. Therefore, the operator can use enzyme-active detergents that are designed for a wide range of cleaning applications. After emptying the bioreactors from their product, the operator can just fill the vessels with such a solution to cover all parts that display caked deposition and incubate their reactors for 24 hours (stirring and tempering will help to get the job done even faster).
Once the parts appear to be clean, the reactor can be disassembled. Rinsing everything thoroughly with water is imperative to remove any residue of the cleaning detergent because the smallest amount will interfere with the next process run and leave the operator puzzled about the failing cell growth. That said, not only surfaces should be washed but also dip tubes, spargers and narrow spaces of any kind, because capillary forces might have drawn some of the detergent into small gaps (e.g. between drive shaft and impeller). For dip tubes, it is recommended to flush them multiple times with water, either using a syringe or by circulating water with a pump connected to them.
If the operator does not want to go through the hassle of cleaning their bioreactors, we recommend using our BioBLU Single-Use Bioreactors , which come pre-sterilized and ready-to-use.
Read more
Running multiple bioreactors in parallel is a great way to perform more experiments in less time and increase reproducibility. Unfortunately, each additional reactor also increases the handling effort. Therefore, here are two tips especially for the operation of parallel bioreactor systems.
Read more
8. Save time with parallel pH sensor calibration
pH calibration of glass electrodes should be performed before each new experimental run. This can be easily achieved thanks to the convenient pH calibration wizard in the DASware® control bioprocess SCADA software . To accelerate this process when setting up parallel bioprocess runs, the operator can fill three beakers with the three different liquids that are required for that procedure: pH 7 buffer (Figure 6, left vessel), pH 4 buffer (Figure 6, right vessel), and water for rinsing the electrodes (Figure 6, front vessel). Instead of calibrating each electrode one by one, they can be inserted into four free ports of a loose headplate which allows the operator to easily transfer all electrodes at the same time from one beaker to the next.
Since pH is a temperature dependent measure, the operator has to make sure to select and insert the “common” temperature sensor into the head plate for the pH calibration. This way, all electrodes will be calibrated under the exact same condition.
Since pH is a temperature dependent measure, the operator has to make sure to select and insert the “common” temperature sensor into the head plate for the pH calibration. This way, all electrodes will be calibrated under the exact same condition.
Read more
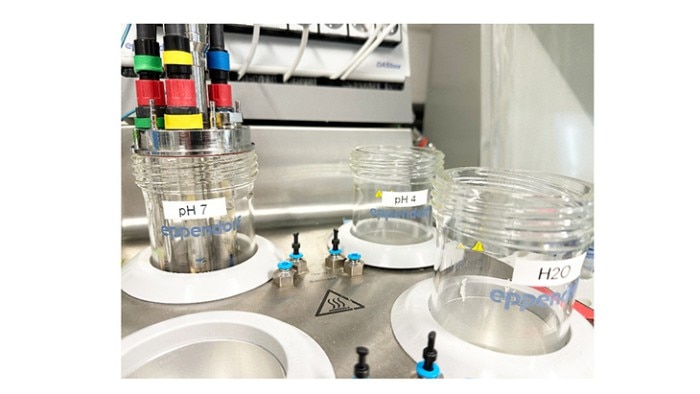
Figure 6: Parallel pH sensor calibration. See text for details.
9. Avoid errors by color-coding of parallel units and corresponding accessories
When working with parallel systems such as the DASbox Mini Bioreactor System , the correct assignment of accessories such as motors, probes and their data cables, tubing lines and the respective connected bottles is essential to guarantee correct process performance. In the heat of the moment, errors can creep into the mapping of tubing lines, especially when things need to move quickly and when multiple bottles must be handled and connected. Additional to the numbering of the different units, the operator can add colored adhesive tape to any accessory and thus color-code everything that belongs to one unit. These visual cues make it much easier to distinguish right from wrong.
If you're struggling with your feedlines, Eppendorf has got you covered with handy cable drillers and feed line labels to help you stay organized.
If you're struggling with your feedlines, Eppendorf has got you covered with handy cable drillers and feed line labels to help you stay organized.
Read more
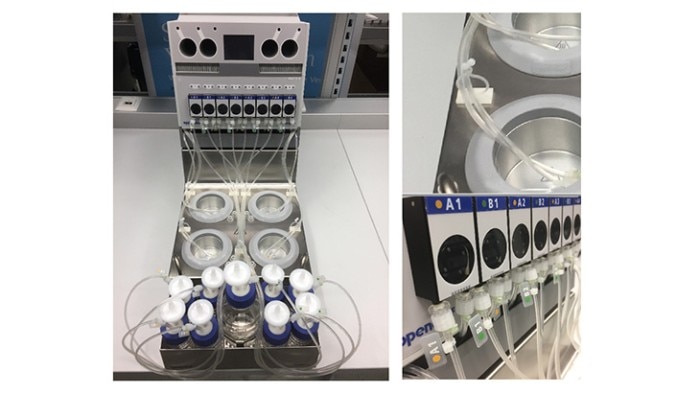
Figure 7: Left: Feed line routing using cable drillers. Top right: Detailed view of cable driller. Bottom right: Feed lines marked with feed line labels.
10. Get the latest lab updates: subscribe to our newsletter
While not a direct bioprocessing tip, subscribing to our newsletter is a valuable recommendation. The Eppendorf bioprocess newsletter keeps you informed with the latest news from our applications lab, including upcoming webinars, new guides, protocols, and more. You'll also receive updates on new products and upcoming events. Don't miss out—subscribe now to ensure you're always in the loop!
Read more