MENU
CH | CHF

CH | CHF
-
- All Pipettes, Dispensers & Automated Liquid Handlers
- Mechanical Pipettes
- Electronic Pipettes
- Multi-Channel Pipettes
- Positive Displacement Pipettes & Dispensers
- Bottle-Top Dispensers
- Pipette Controllers
- Dispenser & Pipette Accessories
- Automated Pipetting
- Automation Consumables
- Automation Accessories
- Liquid Handler & Pipette Services
Sorry, we couldn't find anything on our website containing your search term.
Sorry, we couldn't find anything on our website containing your search term.
How To Clean a Centrifuge & Maintenance Tips
Lab Academy
- Health & Medicine
- Centrifugation
- Centrifuges & Rotors
- Essay
It’s the same for everything that’s important to you – if you treat it properly and handle it with care, you will be able to enjoy it for a long time. Centrifuges are no exception, with regular cleaning and maintenance required to ensure your instrument operates safely and effectively.
Below, read our expert tips on how to clean a centrifuge, including centrifuge lids, rotors, and accessories, for optimal performance year after year. You can also find our top tips for routine centrifuge maintenance, with recommended routine tasks on a weekly, monthly, and annual basis.
Read more
Cleaning & disinfection
! Switch off the device and disconnect it from the power supply before starting any cleaning or disinfection.
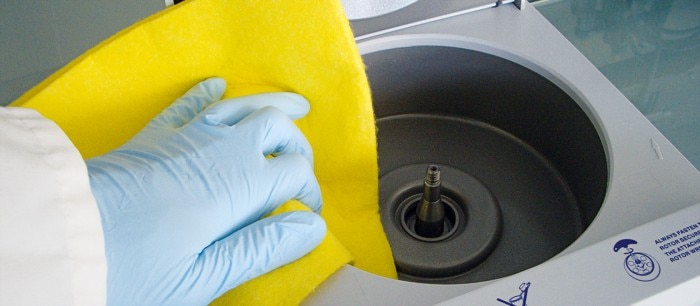
- The outside of the centrifuge, the rotor chamber, and the centrifuge lids (including fixed and removable lids) should be cleaned regularly with neutral detergents. This is for hygienic purposes as well as to prevent contamination caused by residual contamination.
- Only neutral agents may be used for cleaning and disinfection (e.g. diluted neutral alcohol-based disinfectant or 70% isopropanol mixture).
- Residue from detergents should be removed. Also remove condensation and clean the condensation tray (if applicable). Leave the centrifuge lid open.
- The rotor chamber and the rotor shaft should simply be wiped with a moist cloth. Please clean your rotor using a neutral cleaning liquid. This will protect the rotor and prolong its service life.
Read more

! Do not use acetone, caustic detergents, or detergents that contain chlorite ions. Corrosion is most frequently caused by using chlorite ion solutions, such as sodium hypochlorite (household bleach). Do not use steel wool, wire brushes, abrasives, or sandpaper, since they may damage the rotor coating (anodized coating) and thus increase the risk of corrosion. We do not recommend putting rotors or lids into the dishwasher, since the aggressive cleaning agents used in dishwashers may result in corrosion.
Read more
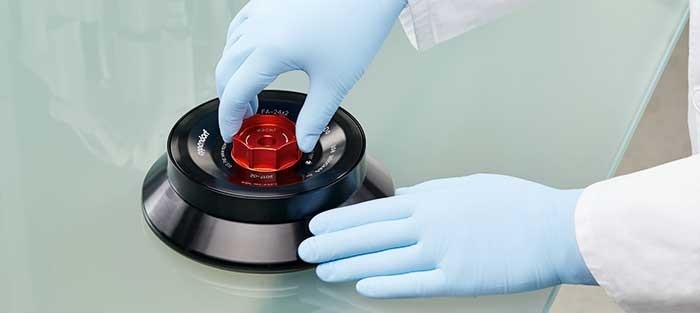
How to clean centrifuge rotors & accessories
When using a swing-bucket rotor, ensure that the bucket grooves are free of contamination. For microcentrifuges and multi-purpose centrifuges, the rotor, buckets, and seals should be lubricated, and for swing-bucket rotors, you should ensure that the buckets can swing out completely, especially when using new tube formats.
Read more
! If aggressive liquid is spilled on your centrifuge equipment, clean it immediately with a neutral cleaning liquid (alcohol or alcohol-based disinfectant). This will protect the rotor and prolong its service life
! Since salt crystals located on the metal surface will corrode the surface, we strongly recommend cleaning the equipment immediately after every use.
! Since salt crystals located on the metal surface will corrode the surface, we strongly recommend cleaning the equipment immediately after every use.
Read more
If there is a stubborn stain, clean with a plastic scrub pad.
How to clean rotor tube cavities or boreholes:
If you need to clean the rotor’s tube cavities or boreholes, use a stiff test-tube brush that has end bristles and a non-metallic tip. Rinse equipment with distilled water and dry thoroughly with a soft cleaning cloth.
For microcentrifuges and multipurpose centrifuges, you should not submerge the rotor body in water completely, since water can remain in the rotor cavities, leading to imbalances during following runs. For some high-speed centrifuge rotors made of anodized aluminium or titanium, brief soaking in pH-neutral solutions can be tolerated, although you should always follow the manufacturer’s guidelines and avoid soaking for prolonged periods.
Read more
Suitable and unsuitable cleaning devices:Allowed:
- Plastic scrub pad
(in case of stubborn contamination) - Stiff brush with end bristles and a non-metallic tip
(if you need to clean the rotor’s bore holes)
- Steel wool
- Abrasives
(might create corrosion)
Read more
How to clean a contaminated centrifuge rotor
Contamination of the rotor through biological material (such as blood) or radioactive material may occur even when you work accurately and carefully. If this happens, please consult your laboratory safety officer first about suitable methods of cleaning and disinfecting hazardous spills within the centrifuge/rotor. Successful disinfection can only be granted by the suppliers of the chemicals.
Before using any cleaning or disinfection method other than what is recommended by the centrifuge manufacturer, please check that the intended method will not damage the rotors, accessories, or other parts of the centrifuge.
Please be aware that the detergents and disinfections are only recommended due to their compatibility with the material of the centrifuges and rotors. The recommended methods for decontamination are disinfection with alcohol-containing liquids, or autoclaving (depending on the rotor materials and manufacturer guidelines).
! It is generally not recommended to use gas, or UV, beta, gamma, or any other high-energy radiation source for disinfection. However, this may be an appropriate alternative to autoclaving for some rotors, buckets, or adapters, depending on their materials.
In general, disinfection with a cloth is more efficient than spraying liquids on the centrifuge, which may also result in a short-circuit within the centrifuge housing. After cleaning with detergent, the rubber seals in the rotor chamber should be rinsed well with distilled water and lubricated to prevent them from becoming brittle. Also, after cleaning, you should check whether the seals of aerosol-tight rotor lids/caps need to be replaced, because aerosol-tightness is only possible with undamaged seals.
Looking to prevent centrifuge contamination? Explore Eppendorf Safe-Lock tubes and aerosol-tight QuickLock rotor lids.
Read more
Autoclaving
The sterilization of rotors and accessories may be desirable to protect humans from pathogens or samples from contamination. Sterilization is a process that eliminates all forms of microbial life, including transmissible agents such as bacteria, viruses, fungi, spore forms, etc.
A widely-used method for heat sterilization is autoclaving, where equipment and other objects are sterilized with hot steam. For instance, a typical autoclaving program is performed at 121° C and 2-bar atmospheric pressure for 15 to 20 minutes.
Several fixed-angle and many swing-out rotor crosses as well as buckets from Eppendorf are autoclavable and have been rigorously tested and approved under these conditions. The aluminum rotors have a special anodized coating, which protects the metal from deeper corrosion effects. Steel swing-bucket rotor crosses with a heat-fixed powder coating are not suitable for autoclaving. If you are in doubt about your rotor, please ask the manufacturer whether autoclaving is possible for that model.
Read more
Eppendorf offers a second type of aluminium fixed-angle rotor with a special PTFE coating, which has outstanding chemical resistance against phenol, acetonitrile, DMSO, acetone, trichloroacetic acid, acetic acid and sodium hypochlorite. This coating is applied on top of the actual anodic coating.
In some cases, autoclaving at temperatures of 121°C for 20 minutes may not be sufficient to sterilize a rotor. Some manufacturers state that autoclaving at 134°C for at least 18 minutes should be sufficient [1], but in some cases, even this is not enough to deactivate the disease agent, especially when using material with very high infectiousness.
According to available material, only a few rotors on the market can be autoclaved at temperatures higher than 121°C. The customer thus has a very limited choice of available rotors – including Eppendorf’s high-quality aluminum rotors – for these applications. Selected Eppendorf rotors have been extensively tested at 142°C for 2 hours or 135°C for 20 min.
Read more
Lubrication
After cleaning your equipment, take a small amount of centrifuge lubricant provided by Eppendorf on your finger. Lubricate bucket grooves, pivots of swing-bucket rotors, and rubber seals. Light waxing of anodized rotor surfaces may also extend service life. Use a soft cloth for the waxing procedure. Rotor chamber seals can be lubricated with standard laboratory-grade glycerol or talcum. However, for high-speed and ultracentrifuges, the rotor body, buckets, and O-rings should be lubricated with a light coat of silicone grease (vacuum grease). In addition, lubricant for the screw should be applied to all thread parts of the rotor, such as the lid locking screw.
Read more
Baseline procedure in case of contamination
- Always wear a laboratory coat, gloves, and goggles.
- If there is broken glass: Retrieve bigger pieces of broken glass with forceps, remove small shards and glass powder with a damp lint-free cloth.
- Absorb blood with gauze or paper towel and seal the material in a biohazard bag for subsequent safe disposal.
- Wipe the contaminated parts with neutral cleaning agent or 70% ethanol soaked gauze or a lint-free cloth.
- If necessary, remove contaminated rotors, rotor lids, buckets, and bucket caps from the centrifuge to decontaminate areas that are difficult to access.
- Autoclave contaminated rotors, rotor lids, buckets, and bucket caps at 121 °C for 20 min.
- After decontamination, clean the equipment with distilled water and dry thoroughly with a soft cleaning cloth.
Read more
You probably intend to use it for a scientific or medical research or an innovation that makes our daily lives easier in some way. And you would like to work towards these goals without any problems along the way. This is why you should care for it – on a daily, weekly and annual basis. We are going to show you how to do that correctly and effectively.
First, pay attention to the manufacturer’s recommendations. If you can’t find what you are looking for in the user manual, contact the manufacturer. Otherwise you risk damaging the centrifuge, accessories or rotors. Please also check the centrifuge regularly for damage caused by corrosion.
First, pay attention to the manufacturer’s recommendations. If you can’t find what you are looking for in the user manual, contact the manufacturer. Otherwise you risk damaging the centrifuge, accessories or rotors. Please also check the centrifuge regularly for damage caused by corrosion.
Read more
Recommended routine maintenance
Daily:
- Before and after use, check the rotor and lid for scratches, dust, or spilled sample material. (Missing anodization on a rotor made of aluminum is a clear indication that a more detailed evaluation is necessary.)
- When using an aerosol-tight rotor, check the seal of the lid.
- Clean your centrifuge on a regular basis to protect your investment and to maximize the lifetime of your instrument and guarantee operational safety, e.g. to prevent accumulation of deposits and to eliminate any possibility of corrosion.
- If necessary, wipe the following parts with a lint-free microfiber cloth:
- Centrifuge housing
- Chamber
- Rotor shaft
- Rotor
- Rotor lid/caps
- Keep the lid of the centrifuge open to reduce pressure on the spring lifts of the centrifuge lid. For refrigerated centrifuges, leave the lid of the centrifuge and the rotor open and allow the device to defrost over night.
Weekly to monthly:
- Keep a maintenance log.
- Carefully remove rotor from centrifuge.
- Make a detailed inspection of the centrifuge rotor, rotor lid, and buckets for cracks and corrosion. For a fixed-angle rotor, check underneath the rotor as well as the tube bores. For a swing-bucket rotor, pay special attention to the pivots and grooves. Differentiate clearly between a scratch and a gouge (= more than damaged color) when evaluating your rotor. A rotor with a gouge or even a small crack must be replaced. Due to the manufacturing process, color variations may occur on rotors marked „coated”. These color variations do not affect service life or resistance to chemicals.
Annually:
Check with your local safety officers for any local regulations regarding centrifuge maintenance. For example, in Germany, regulation DGUV 100 - 500 (formerly BGR 500) requires centrifuges exceeding 500 W nominal power consumption (without refrigeration system) or 10,000 Nm kinetic energy to be inspected by an authorized technician at least once a year in operating condition and at least every three years in a disassembled state.- Eppendorf recommends an annual preventive maintenance inspection by a trained service technician of the centrifuge, rotor, and accessories to guarantee operational safety and maximize the service life of your instrument.
- When using refrigerated centrifuges, clean the refrigeration mesh of the heat exchanger with a brush at least twice a year. We further recommend cleaning the condensate drainage channels on a regular basis, e.g. using a narrow bottle brush.
Read more
References
[1] Lawson, V. A. et al. (2007). Enzymatic detergent treatment protocol that reduces protease-resistant prion protein load and infectivity from surgical-steel monofilaments contaminated with a human-derived prion strain. J Gen Virol vol. 88 no. 10: 2905–2914
Read more
Centrifuge Maintenance Videos
Learn more about recommended routine maintenance for your centrifuge equipment.
Learn more about recommended routine maintenance for your centrifuge equipment.
Read more
Videos not loading, because cookies have been rejected. Change your

Related documents

White paper
PDF
Poster
PDF
Log-File
PDF
Flyer
PDF